APPLIES TO:
- Parallels Desktop 10 for Mac
- Parallels Desktop 9 for Mac
- Parallels Desktop 8 for Mac
- Parallels Desktop 7 for Mac
- Parallels Access
This page has instructions on installing Windows on your Mac for the first time to use with Parallels Desktop.
You can also:
For Windows 8 or 8.1, you can use either the Full Product purchased at retail, or you can purchase the Windows 8 or 8.1 OEM System Builder version and use it in accordance with Microsoft Personal Use Rights. Please be advised that if you choose Windows 8 or 8.1 OEM System Builder Personal Use Rights, you will receive limited support from Microsoft as set forth here:
http://personaluselicense.windows.com/en-US/default.aspx
For earlier versions of Windows, you should purchase the Full Product from a Microsoft authorized retailer.
Important: Windows installation files with an .exe extension can only be used to upgrade an existing Windows Virtual Machine. If you are performing a new Windows install to create a new Windows Virtual Machine, the .exe installation file will not work. Please contact the retailer to request either an .iso image or physical DVD.
Parallels Wizard will automatically detect the installation media you want to use to install Windows

You can also switch to manual mode and choose the source for Windows installation


Note: If you uncheck Express installation, you will need to manually install Parallels Tools after the installation.
When ready, click Continue.

Location: The default location for Parallels Desktop Virtual Machines is /Users/username/Documents/Parallels.
If you want other user accounts on your Mac to have access to this installation of Windows, select Share with other users of this Mac.
If you want to change the default Virtual Machine settings select Customize settings before installation. These settings can also be easily changed later after installation.

Important: The first time you start Windows, Parallels Tools are installed to allow seamless operation between Windows and Mac OS X. Please do not cancel or stop the installation process. Once Parallels Tools are installed, you're prompted to restart Windows.
You can also:
- Upgrade an existing Windows 7, Vista, or XP virtual machine to Windows 8. For instructions, see KB114985 Windows 8 upgrade: step by step instructions and tips for Parallels Desktop users.
- Import data from your Windows PC to your Mac. For instructions, see KB115007 How to migrate Windows PC to Parallels Desktop 8 Virtual Machine.
- If you are using Parallels Desktop 10 you may download&install Modern.IE Test Environment in Parallels Desktop 10
Step 1: Purchase Windows
Parallels Desktop for Mac does not include Microsoft Windows. If you don't have a Windows installation disc or .iso disk image, you can purchase Windows on a DVD disc from many retail stores that sell software or online from retailers such as Amazon.com or the Microsoft Online Store.For Windows 8 or 8.1, you can use either the Full Product purchased at retail, or you can purchase the Windows 8 or 8.1 OEM System Builder version and use it in accordance with Microsoft Personal Use Rights. Please be advised that if you choose Windows 8 or 8.1 OEM System Builder Personal Use Rights, you will receive limited support from Microsoft as set forth here:
http://personaluselicense.windows.com/en-US/default.aspx
For earlier versions of Windows, you should purchase the Full Product from a Microsoft authorized retailer.
Step 2: Create a New Virtual Machine
- Open Parallels Desktop (in the Applications folder) and choose File → New.

- Click Install Windows or another OS from DVD or image file and click Continue.

Step 3: Select the installation media
You may install Windows from a DVD or an .iso disk image or a bootable USB drive.Important: Windows installation files with an .exe extension can only be used to upgrade an existing Windows Virtual Machine. If you are performing a new Windows install to create a new Windows Virtual Machine, the .exe installation file will not work. Please contact the retailer to request either an .iso image or physical DVD.
Parallels Wizard will automatically detect the installation media you want to use to install Windows

You can also switch to manual mode and choose the source for Windows installation

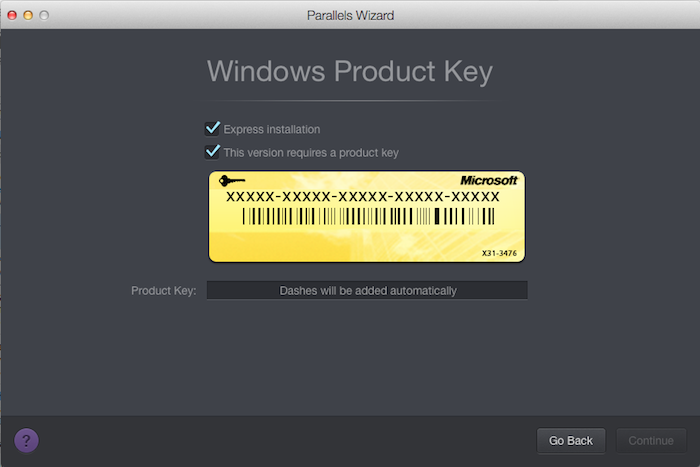
Step 4: Enter your Windows product key
Click Continue. In the Windows Product Key window, leave Express installation selected:
Note: If you uncheck Express installation, you will need to manually install Parallels Tools after the installation.
When ready, click Continue.
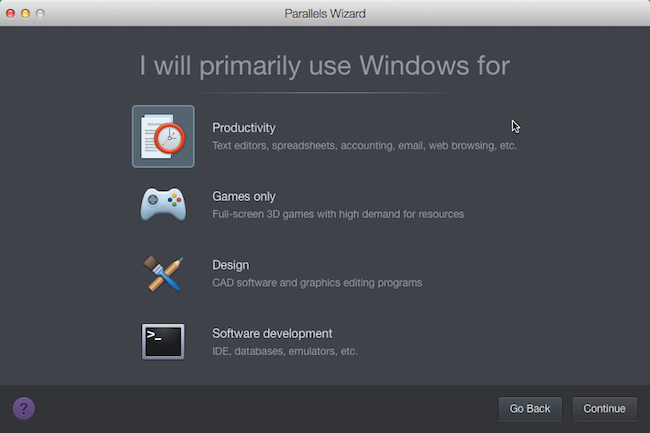
Step 5: Select how you want to use Windows
Select how you want to use Windows:- Productivity
- Games only
- Design
- Software Development

Step 6: Specify a name and location
Name: You may specify a name for your Virtual Machine.Location: The default location for Parallels Desktop Virtual Machines is /Users/username/Documents/Parallels.
If you want other user accounts on your Mac to have access to this installation of Windows, select Share with other users of this Mac.
If you want to change the default Virtual Machine settings select Customize settings before installation. These settings can also be easily changed later after installation.

Step 7: Begin the installation
Click Continue. The Windows installation begins. Once Windows is installed, you can start it by opening a Windows application or clicking the power button in the Parallels Virtual Machines list.Important: The first time you start Windows, Parallels Tools are installed to allow seamless operation between Windows and Mac OS X. Please do not cancel or stop the installation process. Once Parallels Tools are installed, you're prompted to restart Windows.


0 comments:
Post a Comment